No-bake triple chocolate cheesecake tart with a chocolate flower
(Pictured above)
No baking required, but applause welcome. We’re talking a chocolate-crumb base, creamy cheesecake and a glossy chocolate glaze. It’s topped with a chocolate flower, where delicate chocolate brushstrokes form petals that, when assembled, create an exquisite embellishment.
The flower can also be made smaller or larger to garnish countless creations – the petals can be made ahead of time and stored in an airtight container at room temperature below 25C (77F) for up to four weeks. Otherwise, you can assemble the flower directly on the cake so you don’t have to lift and transfer it.
The filled tart can be made up to three days in advance and stored in the fridge. Finish with the chocolate glaze and flower a few hours before serving and keep chilled until ready to serve.
Serves 8 –10
For the chocolate crumb base
200g chocolate ripple biscuits (or plain chocolate cookies)
80g unsalted butter, melted
For the cheesecake filling
190ml thickened cream
410g cream cheese, at room temperature, cubed
50g caster sugar
15g pure icing sugar
½ tsp ground nutmeg
1 tsp vanilla bean paste
A pinch of salt
1½ tsp lemon juice
For the chocolate glaze
95ml thickened cream
35g liquid glucose
90g good-quality dark chocolate
½ tsp vanilla extract
For the chocolate flower
250g good-quality dark chocolate
To make the chocolate crumb base, grease a fluted flan tin, 20cm in diameter and 3.5cm high, and line the base with baking paper.
In a food processor, crush the biscuits to a fine crumb.
In a bowl, mix the biscuit crumbs with the melted butter, then press into the base and side of the flan tin. (I use the lid from a can of vegetable oil spray to press the biscuit crumb into the base of the tin. If the biscuit crumb is not compressing, put it back in the bowl and add a little more butter.) Refrigerate until required.
To make the cheesecake filling, in the bowl of a stand mixer with a whisk attachment, semi-whip the cream on medium speed until it has some body but still collapses. Set aside in a bowl and refrigerate until required.
Change the whisk to a paddle attachment. Mix the cream cheese on medium speed until softened. Add the caster sugar, icing sugar, nutmeg, vanilla and salt, and continue to mix until smooth and creamy, scraping down the side of the bowl as required. Add the lemon juice and mix until incorporated.
Remove the bowl from the mixer, add the semi-whipped cream and gently fold it through.
Spoon the filling into the prepared tart shell and spread until smooth and even, ensuring there is enough space remaining for the chocolate glaze. Refrigerate to set for a minimum of one hour.
To make the chocolate glaze, combine the cream and glucose in a saucepan over medium heat and bring to the boil.
Put the chocolate in a bowl, then pour the cream mixture over the chocolate and whisk until the chocolate is completely melted and incorporated. Add the vanilla and mix to combine. Cover with plastic wrap, ensuring the plastic is in contact with the surface of the chocolate mixture, and leave to cool at room temperature. Set aside until ready to use.
To make the chocolate flower, cut six strips of baking paper, approximately 7 x 30 cm.
Temper the chocolate by placing it in a microwave-safe plastic bowl and heating it in the microwave on high in 30-second increments, stirring in between. Once you have 50% solids and 50% liquid, stir vigorously until the solids have completely melted. If you have some resistant buttons, gently heat the chocolate with a hairdryer, while stirring, until melted.
To create the petals, dip a dry pastry brush in the tempered chocolate, then brush several petal-shaped strokes on to the baking paper strips. Aim for about five petals on each baking paper strip.
Leave 10 petals flat on the work surface and slide 20 petals, on their baking paper, just to sit in the mouth of a wide jug to curve them as they set. Leave to set at room temperature, then gently remove the baking paper.
Use a hairdryer to gently reheat the remaining melted chocolate, while stirring. Place a teaspoon of the chocolate in the centre of a 3cm square piece of baking paper.
Create an outer layer of petals by arranging five of the flat petals in a circle so that each base is in contact with the melted teaspoon of chocolate.
Place another teaspoon of melted chocolate in the centre, and arrange the remaining flat petalsto sit between the first layer of petals.
Dip the back of each curved petal in the melted chocolate, then add them to the centre of the flower base until the flower is full.
Leave to set at room temperature. (The recipe makes additional petals to allow for breakages.)
To assemble, remove the cheesecake from the tin and transfer to a serving plate. Heat the prepared glaze in the microwave on high, gently stirring at regular intervals, until just warm to the touch.
Carefully pour the glaze to cover the top of the cheesecake. (Any remaining glaze can be served with the tart.) Carefully transfer the chocolate flower to the top of the tart, and serve.
Jewelled pistachio and cherry chocolate snowflakes
These snowflakes are delicate and decorative – the sprinkling of pistachios and glacé cherries adds colour, flavour and fun. If you’re not vibing with pistachios, cherries and coconut, switch them with your favourite medley of nuts and dried or glacé fruit. These are just as delicious made with white or dark chocolate.
Makes 15
20g desiccated coconut
150g good-quality milk chocolate
20g glacé cherries, finely chopped
20g pistachios, finely chopped
Preheat the oven to 160C. Line a baking tray with baking paper.
Spread the coconut evenly over the baking tray and bake for five to six minutes. Remove from the oven half way through baking to stir, which will ensure you achieve an even colour. Once golden brown, remove from the oven and leave to cool completely at room temperature.

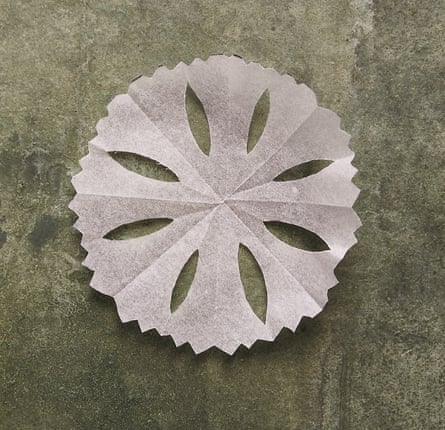
You will need to cut 15 individual snowflake templates out of baking paper, approximately 9cm in diameter. To do this, start with a 10cm square of paper. Fold it in half, then in half again to create a smaller square. Fold the two folded edges together to create a triangle. Fold the two folded edges together again to create a narrower, asymmetrical triangle. Trim off the excess paper at the open end of the triangle so that all layers of the triangle are the same size, then trim the open edge in a zigzag shape. Along the long folded edge of the triangle, cut a half-oval shape – the longer it is, the bigger the oval will be on the snowflake. Open out the paper. Repeat to make 15 templates.
Temper the chocolate by placing it in a microwave-safe plastic bowl and heating it in the microwave on high in 30-second increments, stirring in between. Once you have 50% solids and 50% liquid, stir vigorously until the solids have completely melted. If you have some resistant buttons, gently heat them with a hairdryer while stirring to melt them.
Prepare a tray lined with baking paper. Place the templates on a flat surface and spread the chocolate over them using a small knife or a brush. Make sure the chocolate is thick enough – it should be at least 2mm thick – and as even as possible to help prevent cracking.
Working quickly, sprinkle the coconut, cherries and pistachios over the melted chocolate. Before the chocolate sets, use a small knife to help lift each snowflake, with its paper template, and place on the lined tray. Scrape the excess chocolate into a bowl, so it can be used again.
Allow the snowflakes to set. Once the chocolate has set, cover the tray with another sheet of baking paper and place a second baking tray on top, which will help to prevent the chocolate from curling as it contracts. Leave the tray on top for at least an hour.
Once set, carefully remove the baking paper template from each snowflake. The snowflakes can be made up to three months in advance and stored in an airtight container at room temperature below 25C.
Lamington ice-creams with raspberry and coconut

It’s homemade ice-cream with a lamington spin, with hints of fresh raspberry, a chocolate shell and loads of coconut. Don’t have ice-cream moulds? This frozen treat is just as good made in a tray. Simply slather the ganache over the ice-cream and add a sprinkle of coconut. The ice-creams can be stored in the freezer for up to four weeks, and any leftover ganache coating can be frozen for up to eight weeks.
Makes 16
For the white chocolate no-churn ice-cream
285ml thickened cream
½ tsp vanilla bean paste
75g good-quality white chocolate
200ml sweetened condensed milk
125g fresh raspberries
For the ganache coating
300g good-quality dark chocolate
100g desiccated coconut
420ml thickened cream
To assemble
16 popsicle sticks
To make the ice-cream, combine 100ml of the cream and the vanilla in a saucepan over medium heat and bring to the boil.
Place the white chocolate in the bowl of a stand mixer with a whisk attachment. Pour the boiled cream over the chocolate and whisk until the chocolate is completely melted and incorporated. Add the remaining cream and whisk to combine. Cover with plastic wrap touching the surface of the mixture, then refrigerate a minimum of five hours.
Once the cream base mixture has chilled, place the condensed milk in the bowl of a stand mixer with a whisk attachment. Pour the chilled chocolate cream mixture over the condensed milk, add the raspberries and whip on high speed until it forms soft peaks.
Divide the mixture between 16 mini ice-cream silicone moulds, then insert a popsicle stick into each ice-cream. Freeze for at least six hours, preferably overnight.
Once the ice-creams are completely frozen, make the ganache. Place the chocolate in a microwave-safe plastic bowl and melt in the microwave on high in 30-second increments until 50% melted.
Heat the cream in a saucepan over medium heat and bring to the boil. Pour the boiled cream over the chocolate and whisk until the chocolate is completely melted and incorporated. Transfer the ganache to a tall jug or vase that is just wide enough to dip an ice-cream into.
Tip the coconut into a wide bowl, and line a tray with baking paper.
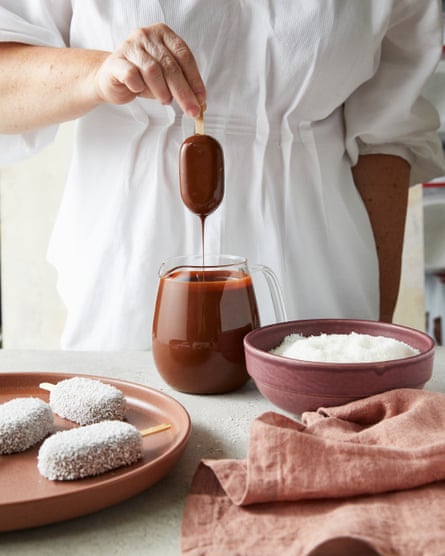
Working with one ice-cream at a time, remove the ice-cream from its mould. Dip each ice-cream in the jug of ganache, then hold over the bowl of coconut. Scoop up the coconut and sprinkle it over the ice-cream until all the ganache is coated. (Alternatively, place the ganache-coated ice-cream on top of the coconut and use a dessert spoon to scoop up the coconut and sprinkle it over the ice-cream. Try not to move the ice-cream too much while coating with coconut, as it can make the surface of the ice-cream lumpy.) Place the ice-cream on a tray lined with baking paper and freeze for a minimum of one hour before serving.
-
This is an edited extract from Chocolate All Day by Kirsten Tibballs. Photography by Armelle Habib, available now through Murdoch Books (RRP $49.99)

